LED Connectée⚓
Introduction
Ce tutoriel montre comment réaliser une application Android qui se connecte à une carte Arduino grâce à un module Bluetooth. Cette application commande l'allumage et l'extinction d'une LED connectée à la carte Arduino.
Prérequis nécessaires : Avoir fait les tutoriels d'initiation à Arduino et à App inventor2.
DESIGNER
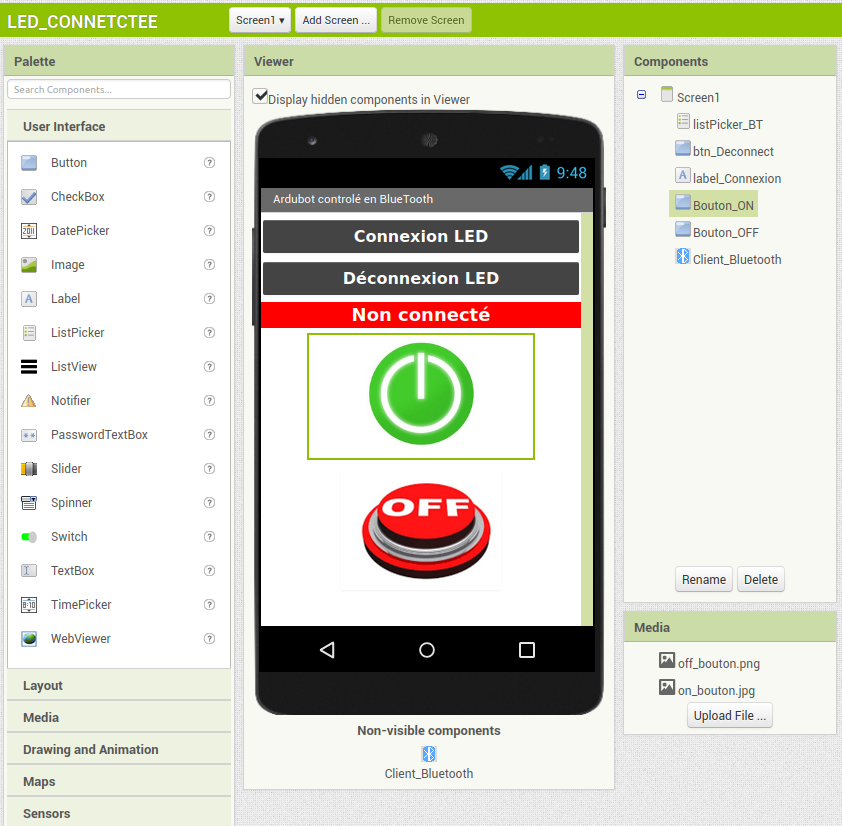
L'écran comporte :
• Le ListPicker_BT permet d'établir la connexion avec le module BT
• Le Label Label_Connexion pour afficher l'état de la connexion
• deux Boutons : Bouton_ON et Bouton_OFF pour la commander la LED
• Un bouton btn_Deconnect pour la déconnexion du module BT
• et le composant invisible Client_Blutooth
Créer un nouveau projet nommé LED_CONNECTEE sous App inventor 2.
Réaliser l'interface suivante :
Au centre-droit de l'écran, il y a la liste des composants que vous devez glisser et poser de la palette vers le viewer.
À l'extrême droite de l'écran apparaissent les propriétés des composants que vous devez personnaliser.
Cliquer sur Blocks (en haut à droite) pour passer à l'écriture du « code ».
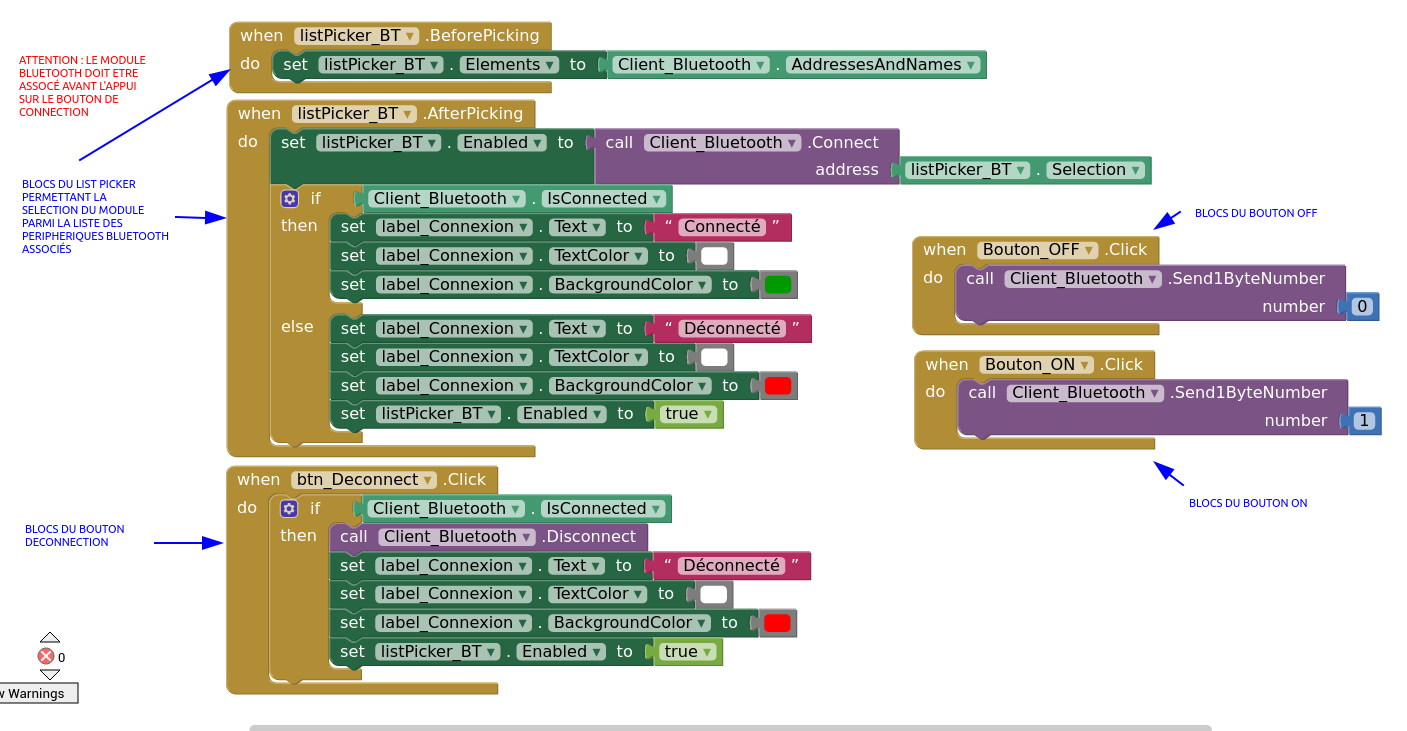
BLOCKS
Réaliser le « code » suivant :
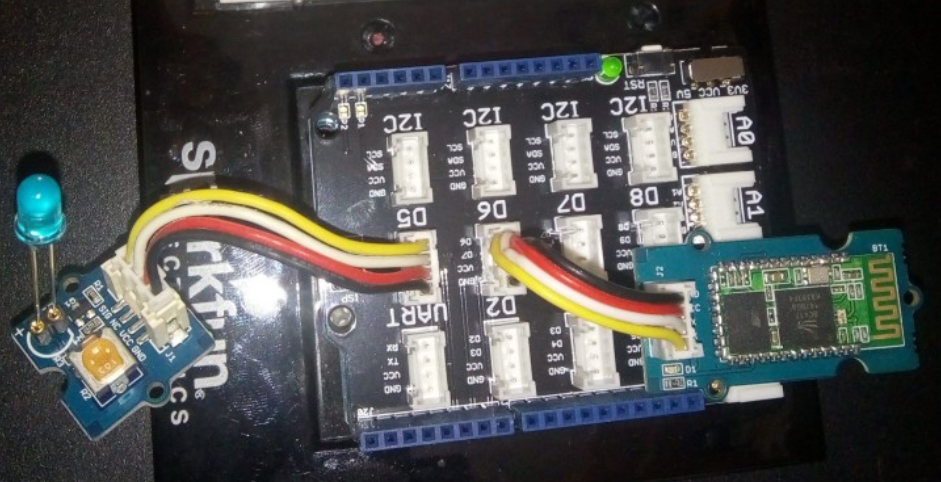
Côté Arduino
Matériel nécessaire :
Une carte Arduino UNO
Un shield GROVE
Un module grove Bluetooth
Un module grove LED
Connexions :
La LED sur D5 et le module bluetooth sur D6.
Dans le logiciel Arduino vous devez modifier le programme suivant pour obtenir
Un nom original de l'interface Bluetooth
Un code plus sécurisé.
/* * Programme permettant l'allumage et l'extinction d une * LED en fonction de la valeur d'un caractere recu via * le module bluetooth connecte aux broches 6(Rx) et 7 (Tx) * de la carte arduino UNO. La LED est reliee à la broche 5. * Si le caractere recu vaut '1' la led s'allume * Si il vaut 0 la LED s'eteind. */const int RxD = 6; // Broche de reception de donnees
const int TxD = 7; // Broche de transmission de donnees
const int PINLED = 5; // Broche de la LED
/* * PARAMETRES BLUETOOTH : */String Nom_Du_Module = "MaSuperLED";
String PIN_Du_Module = "1234";
SoftwareSerial blueToothSerial(RxD,TxD); // Liaison serie du module Bluetooth
void setup()
{Serial.begin(9600);
Serial.println("Bluetooth module");
pinMode(PINLED, OUTPUT);
setupBlueToothConnection(Nom_Du_Module, PIN_Du_Module);
}
void loop()
{char recvChar;
while(1)
{if(blueToothSerial.available()) // SI DONNEES RECUES
{recvChar = blueToothSerial.read();// Lecture des donnees
Serial.print(recvChar); // Affichage au moniteur serie
if(recvChar == 1) // Si le caractere recu est un "1" :
{digitalWrite(PINLED, HIGH); // On allume la LED
}
else if(recvChar == 0) // Si c'est un 0
{ digitalWrite(PINLED, LOW); // On l'eteint
}
}
}
}
/*************************************************************************** * La fonction setupBlueToothConnection() permet d'initialiser le module * Bluetooth. La confiuration est ***************************************************************************/void setupBlueToothConnection(String nom_du_module, String pin)
{ blueToothSerial.begin(9600); // Vitesse de transmission : 9600 bauds
blueToothSerial.print("AT"); // Reponse du module BT
delay(1000);
while(blueToothSerial.available())
{char recvChar = blueToothSerial.read(); // Reponse du module BT
Serial.print(recvChar);
}
Serial.println("");
blueToothSerial.print("AT+DEFAULT"); // Config usine (par defaut)
delay(2000);
while(blueToothSerial.available())
{char recvChar = blueToothSerial.read(); // Reponse du module BT
Serial.print(recvChar);
}
Serial.println("");
String at_command("AT+NAME"+nom_du_module);
char *at_str = at_command.c_str();
Serial.println(at_str);
delay(5000);
blueToothSerial.print(at_str); // Nom du peripherique BT
// Longueure max 12 caracteresdelay(5000);
while(blueToothSerial.available())
{char recvChar = blueToothSerial.read(); // Reponse du module BT
Serial.print(recvChar);
}
Serial.println("");
at_command="AT+PIN"+pin;
at_str = at_command.c_str();
blueToothSerial.print(at_str); // Configuration du code PIN
delay(2000);
while(blueToothSerial.available())
{char recvChar = blueToothSerial.read(); // Reponse du module BT
Serial.print(recvChar);
}
Serial.println("");
blueToothSerial.print("AT+AUTH1"); //
delay(2000);
while(blueToothSerial.available())
{char recvChar = blueToothSerial.read(); // Reponse du module BT
Serial.print(recvChar);
}
Serial.println("");
blueToothSerial.flush();
}